Sample Library organization

Organizing your sample library is always problematic. When you're on a roll and want to find a specific sample quickly but can't remember where it is.
Well, perhaps Coggle can help.

coggle logo.PNG

Coggle is a freeware mind-mapping web application. Like other mind-mapping software, Coggle produces hierarchically structured documents, like a branching tree.
What this means is, at the least you will be able to layout your sample folder structure so that you can decide, in a simple visual way, what structure will best suit your style of music.

Here is my complete folder structure, including business and client folders.

complete folder structure

here is a view of part of my Sample Library structure

How I use Trello as a Composition Project template

Trello

Trello is a collaboration tool that lets you organise your projects into boards. In one glance Trello tells you what's being worked on, who's working on what, and where something is placed in a process.

Trello lets you lay out information across a Board which can contain many Lists, each of which can hold many cards into which you can add comments, upload file attachments, create checklists, add labels and due dates, and more. Best of all, it's free (unlimited Boards, Lists, Cards, Members, Checklists, and attachments).
I have found that using Trello to help me remember and comment on each step of my music production has been very useful.My Music Project Board hold many Lists, filled with cards, which can be about any aspect of your music production. I have cards covering musical key structure, production notes, sound design tricks, and so on.

Master template

Whilst my Music Items board has many cards covering many subjects, what I will show you today is the content of my Master Template list. Each time I work on a new piece of music, I copy this template, rename it with the song working title and place it in my Song List.

The template list is made up of several sections. The first section covers general items about the song as you can see below.

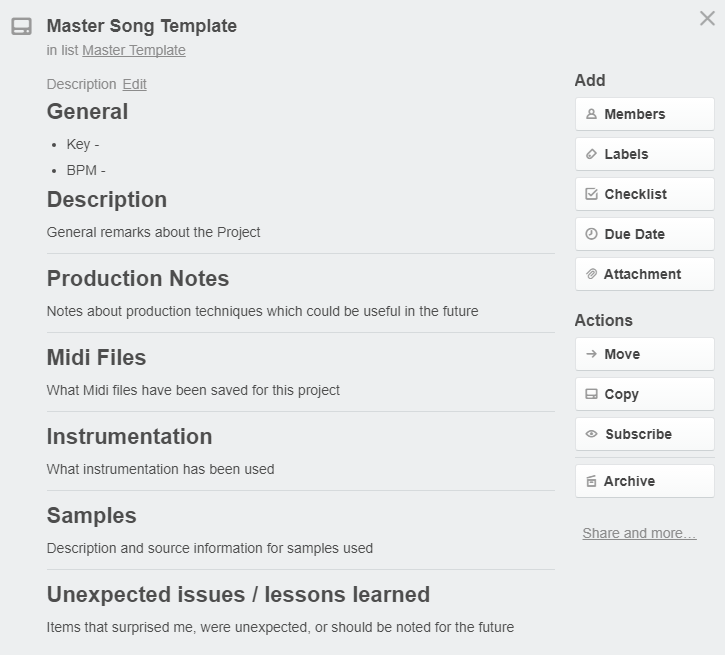
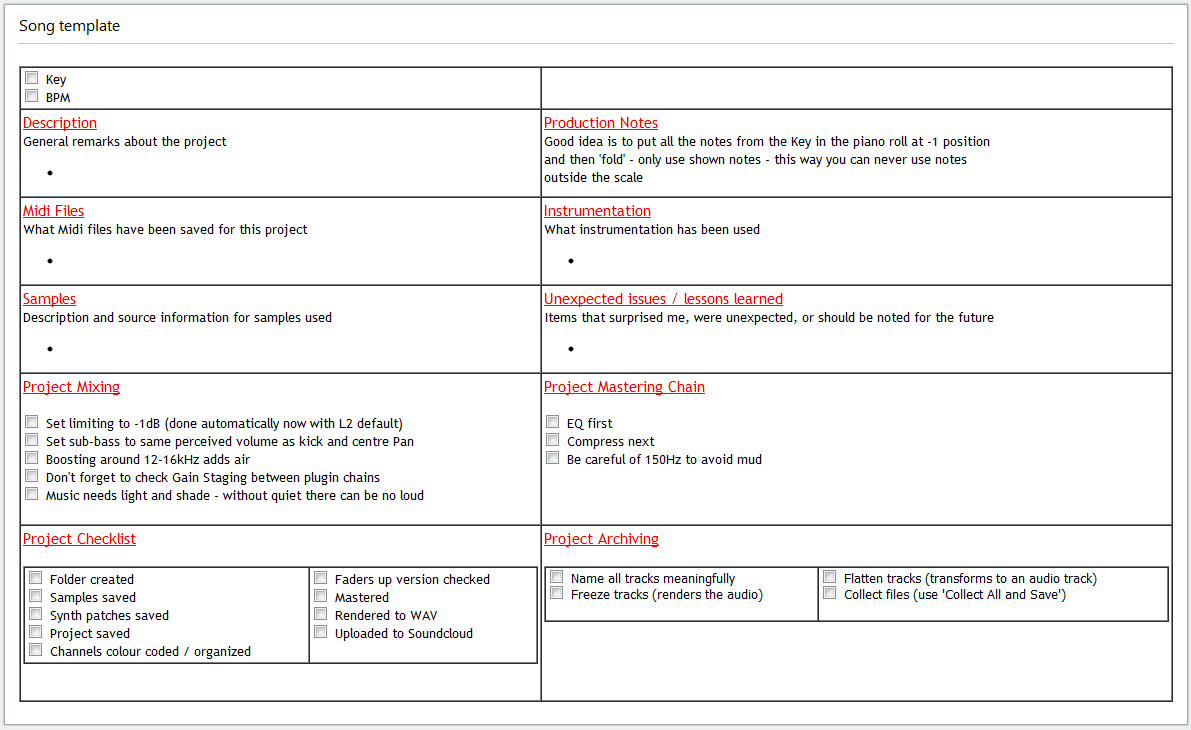
Ableton Master Song Template

Ableton Master Song Template

  1. General - This section is to hold the Key and tempo of the piece

  2. Description - where I can write anything important about the inspiration and development I followed

  3. Production Notes - relate to the more technical aspects

  4. Midi Files - gives details about what midi files were used in the piece and which have been saved in the project folder

  5. Instrumentation - is where I write about which instruments, VST's, etc. have been used and give details about any special settings

  6. Samples - Samples allows me to give details about any special samples which have been used and keep records for any subsequent sample clearance which may be needed

  7. Unexpected Issues / Lessons Learned - an important part of the learning process is to reflect on what you have learned . What things you were pleased with that you want to remember, and perhaps, things that didn't work out as you wanted that you would rather forget

Project Mixing

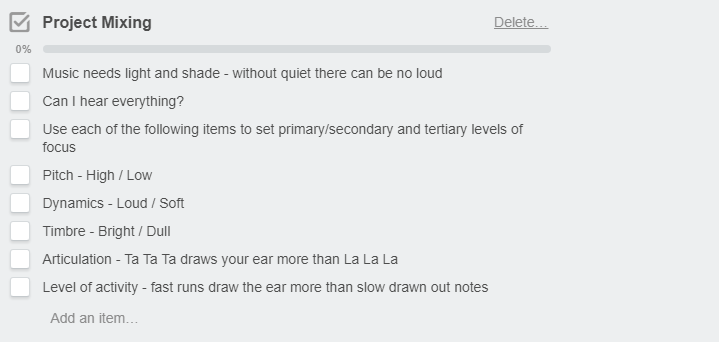
The next section of the list is a checklist which Trello handles very nicely, Here I check the overall mix of the project. How it feels when I listen to it. The checklist helps me remember important points to watch out for whilst listening.

Project mixing section

Project mixing section

Project Mastering Chain

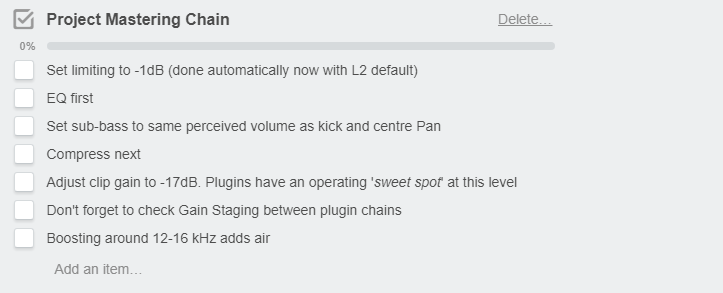
Project mastering checklist

Project mastering checklist

The Mastering Chain checklist reminds me about mastering aspects I need to take care about after the project has been mixed and is ready for mastering.

Set the limiting at -1dB to make sure you don't get distortion from inter-sample peaks and keep a careful eye on gain staging as the signal passes through the signal path.

Project Checklist

General Project Checklist

General Project Checklist

The Project Checklist helps me with project housekeeping. They are all pretty self explanatory.

These are the items we may tend to forget in the heat of the creative moment, but if you have ever gone back to a project after a year or so either for yourself or when a client asks if they could have a different mix of the project, you will be very glad that you followed this little checklist.

Project Archiving

Final Project Archiving

Final Project Archiving

The last little checklist could be part of the Project Checklist but I prefer to separate it out as a last little check that I have done all the checks for the project that should be done.

Summary

Trello is the perfect tool for this sort of work. I can very easily update the text or add new points to my checklists at any moment. Having these handy whilst working on a new project makes it simple to follow a routine.

When all is finished I simple save as a PDF file in the appropriate computer folder. I also keep a printed version for easy consultation at any time.

If you have any ideas or suggestion about making this process better let me know, and if you would like to use the Music Template yourself in Trello please let me know and I can share it as a public List.

How to always choose notes from the key you are working in

When creating melodies, bass runs or chords you will probably want to choose notes that fit the key you are working in.

20150205 key1.PNG


If, like me, key theory doesn't come naturally to you here is a quick way to be sure that you can only choose notes which come from the key you are working in. 


This makes it a snip to focus on the creative work without having to stop and consider key theory.
Take the 'C minor' Midi file (or any other scale that you want to use) from Keys and chords and place it in the Session View.


Next select all the Midi notes and move them up or down until the Tonic (lowest note) matches the Key that you want to work in. For example moving to A# (Bb) will give you a key of Bb minor

20150206 key1.PNG

Press 'Fold' to collapse all the notes. Select all the notes and use Shift up/down arrow to select a suitable range for your song.


20150206 key2.PNG

Now delete all the notes and you are left with a grid which contains only the notes of the scale that you have chosen.

Now every note that you place in your song will be musically in-tune with your chosen scale.

Great for writing chords too.

How to use Ableton Templates to speed your workflow

I’m sure that like me, you want to spend your time creatively, rather than drowning in the technical aspects of your chosen DAW, then anything that helps speed up your workflow is important.

In Ableton Live, using templates is one of the biggest time savers when starting a new project. Ableton comes ready loaded with a set of templates which you can use. Look under the Live 8 Library and you will find the Ableton Master Template folder. Double-click any of these templates to load them.

ableton-master-template.png

However, that’s only the start as you can add your own Audio and Midi tracks with your preferred devices and effects and save this as your own template.

Use ‘File/Save Live Set as‘ and place it in Ableton’s Template folder in the Ableton Library. As an example, you may choose to add an EQ 8 and Compressor to each Audio track and a Simpler to each Midi track.

Note : the default template used when you create a new set, resides in Live’s Preferences folder rather than in the Library, so If you want your template to be the default one each time you open Ableton use ‘Options/Preferences/File Folder‘ and click the ‘Save Current Set as Default‘ option.

preferences1.png

Personalize

The tracks you want in your Template will depend on your workflow and the instruments you have. The default contents for each audio / midi channel will also be your personal choice, however, you might imagine to add a Compressor to drum tracks and a Reverb to Hi-Hats for example.

A good tip is if you add many instruments and effects to your tracks, switch them off to save computing power. De-activated devices in Ableton use no power so you can add as many as you may need – only switch them on when you need them.

Think of it like walking into a fully equipped recording studio with all the instruments laid out ready for you to start creating.

Here is the Arrangement View from my Template

arrangement.png

Some highlights are:

  • Colour your tracks to help speed navigation

  • Set the devices and effects you want in your Audio tracks – I have an SSL Channel strip

  • Set the devices and effects you want for each Midi track – I have a Simpler

  • I have a ‘Master Mix’ track for Mastering to

  • I have a ‘Faders Up’ track for rough mixes that I can export audio from to listen on other systems e.g. in the car the following day

  • Next is a ‘Reference’ track containing commercial track excerpts that I can reference against split into instrument types with the tonal balance you’re looking for – ideally something that hasn’t been totally decimated in mastering

reference.png
The Session View of my Template

The Session View of my Template